Showing posts with label Savory. Show all posts

03 July 2020

Crumbed Fish and Chips

Who doesn't like an easy yet delicious dinner?  Tonight, as I need to look after one kid and one baby in the home, I need something that effortless and flavorsome dish.  This crumbed fish and chips is super easy to make.  I used a pegasius fillet fish for this dish but other types of fillet like basa or cod fillet also made a great dish.  

Firstly, prepare the dry ingredients on the plate, flour, beaten egg and panko bread crumbs, all in a separate plate.  For the flour, combine it with some seasoning, like salt, pepper, and abit of chili powder or paprika powder for adding some punch to the fish.  In another plate or wide bowl, lightly beaten the egg, then leave it aside.  On the last plate, fill in with some bread crumbs.  If panko bread crumbs is not available, you can also use the ordinary bread crumbs. 

After that, cut your fish fillet into a fish-finger size and flavoring it with some salt and pepper evenly.  Then, dip them first in the flour and shake out some excess flour.  Next, coat them with beaten egg and lastly cover them with bread crumbs.  Repeat the same process and do it for all the fish. 

First plate is seasoned flour

Second bowl is beaten egg

Third bowl is panko bread crumbs


Once you are ready for deep frying, heat the oil in the pan until the bubble is sticking on the chopstick when inserted in the hot oil.  Fry them in batches so it won't be too overcrowded.  Flip them over time and cook until golden brown.  After you finished with fish, jump onto frying the chips. 

In the mean time, make your dipping sauce.  You can use the store-brought tartar sauce or make this sweet chilli mayo sauce.  What you need to do is combining the same portion of sweet chilli and mayo and stir them well. 


One or two pieces already in my mouth before it reaches the dining table.  So mouthwatering....  So crunchy....  So delightful....


Sweet chilli mayo dipping sauce


What I did with leftover egg is deep frying them on that oil.  Slowly drop your egg in the hot oil through the strainer so it will create some crispy egg floss.  Break them up and cook until light brown then drain them on the paper towel.

This prepartion and cooking time took me about half an hour but yet I can do something else meanwhile when frying.  But it only took 10 minutes for us to munch them all.  Now, all done and dusted...  Good night everyone and Octie Appetie....


24 June 2020

Spaghetti Bolognese

This is my version of spaghetti bolognese.  Italians may be crying when looking at this recipe.  There are major changes to make this dish tone with my palate.  So, let's find out how I normally make my style of spaghetti bolognese.


Always gather all your ingredients before you start stir-frying.  It will be very handy.  In this my-own-version of bolognese, I prepared minced garlic, chopped onions, chopped tomatoes, sliced chilies, minced pork, sausages, Prego traditional pasta sauce.  And for seasoning, I have some salt, pepper and sugar.


Starting with stir-frying chopped garlic and sliced chilies on your hot pan with some oil until fragrant.  Then add in minced pork.  Cook the pork until nearly done then add in your chopped onion.  I like to put onions in after the meat cooked, so they will be slighly undercook and can stay crunchy.  After that, add chopped tomatoes, sausages, and pasta sauce.  I also add a little bit water because I want it to be saucy or I could say it'd rather soupy.  About quater of a can of water for each pasta can you use.

Once the cooking is nearly done, add your seasoning.  And tasted according to your preference.  Sugar is one of the main seasoning in this recipe.  So my pasta sauce came out slightly to the sweeter side.  But it is so delicious....  Bring them to boil and remove from heat and set them aside.


Now, jump onto the pasta noodle itself, boil water on a pot with a dollop of salt.  Once the water bubbling add in your pasta and cook them for 12 minutes or so depending of how you like to have your pasta.  


The trick to make your pasta not sticking together is by adding a splash of olive oil right after your drain the pasta.


Instead of serving the pasta and sauce separately, I like to combine them together.  Therefore, the noodle absorbs the juices from pasta sauce very well.  Bring the dish to the next level.


Not forget to add some grated parmesan on top as well.  What can I say, it was just yummm... yummmm... and yummmmm....

You can also store the leftover pasta in the fridge and taste even better after reheating it.  Because the pasta and sauce are well married and got along together thoroughly.

13 June 2020

Super Easy Fried Rice


When you have a five years old kid at home is kinda challenging to some cook delicous food yet healthy that your kid will even beg for the second bowl.  This simple and super easy fried rice is the total package.  It has got protein from egg and minced pork.  It has got vitamins from tomatoes.  Also, it has got carbs from rice.  So, protein, vitamin, and carbs all ticked.  Above all, it will take less than 15 minutes from preparation until the final result.

For the seasoning, I only put some salt, pepper and Indonesian sweet dark soy sauce.  Then do like you normally do with your fried rice.  Stir fry and combine them together.  And waa.. lahh.. my kid ultimate dish at all time.  Make sure that you cook some extra, because your kids may ask for the second bowl.


08 June 2020

Japanese Chicken Curry


So many countries in Asia have their own signature curry dishes.  Here in Japan, their curry is a lot more subtle and light compared to Indian curry or Thai curry.  Japanese curry has less spices, therefore the taste is pretty sweet and not too strong.  This curry should be easy to devour especially for the curry first-timer.

I bought these packaged curry cubes from Japanese groceries stores ortherwise this product is widely available in many Asian supermarkets as well.  There are different levels of spiciness to choose from.  I picked the least heat one which is suitable for my children.  Japanese curry can be served over rice or udon or even bread.


How to make them is also pretty simple.  On the hot pan, drop some cooking oil and cook slices of chicken meat until they cooked halfway through.  Then add in some carrots, potatoes and onions.  Cook them for another two or three minutes while turning occasionally.  After that, add in chicken stock or simply water just enough up to where some items still slightly emerge on top of the water.  Bring them to boil and turn the heat down and keep the stock simmering uncovered for 20 minutes, stirring occasionally.

When the vegetables are ready, add the curry cubes in a laddle and let it slowly dissolved with spoon.  I used 4 cubes for this recipe which served for 6 persons.  Add some seasonings like salt or soy sauce.  Simmer on low heat, until the curry is thickened.  Serve the curry with rice or udon.

Furikake


Normally in Japan, curry is served over pork katsu or deep-fried crumbed pork fillet.  So, what I did here, is to serve my homemade Japanese curry over some karaage or deep-fried chicken for double meat effects.  Then I also topped with furikake (dry rice seasoning).  It was a very very delicious meal indeed.   Good luck trying, guys and Octie Appetie......

27 May 2020

Scrambled Eggs with Truffle Butter


Anything truffle is so intrend these days, from truffle aglio olio to soup and dippings.  I currently discovered this truffle butter sold in supermarket.  It is quite pricey compared to any flavored butter.  But it is worth trying.  You can use as a spread over some bread or what I made is scrambled eggs using this gorgeous thing.  

My recipe is a pretty simple one (I adapted from Marion Grasby's scrambled eggs with miso butter).  Firstly, crack 2-3 eggs in a bowl.  Normal serving of scrambled egg for one person is three eggs.  Because unlike fried egg or omelette, the egg kinda shrink when it turns into scrambled.  Then season it with some salt and pepper.  Lightly beat the eggs.  Do not  beat the eggs vigorously, as it will result in fluffier curds.  Milk is not needed in this recipe.  Yet you will still get creamy and tasty egg dish.  

Next, you can heat your pan with some butter.  Make sure it is low to medium heat becasue we don't want to overcook the egg.  Wait until the butter has completely melted but not bubbling.  Then pour all you whisked egg into the hot pan.  As the eggs begin to set, using your spatula or ladle scrap or draw them in from outside to inside motion.  Do this for one or two more times, until about 80% of the egg is forming into large soft curds.  After that, drop about one tablespoon of truffle butter and give them some stir.  Keep scambling until the butter is entirely melted.  And you can turn off the heat and remove the egg straight away from the pan otherwise the leftover heat will firm up the eggs.  Because at the end, you will definitely want your scrambled egg to be creamy with slightly gooey.  

It is tasted soooooo delicious.  Once I have this truffle butter scrambled egg, I can't go back to an ordinary scrambled egg nomore.  So beware, guys.  You can pair them with some simple toast or whichever way you normally have your scrambled eggs.  


Simple wholemeal toast with truffle butter scrambled eggs

20 May 2020

Kimchi Jjigae (Kimchi Soup)


Most of the time when I visited a Korean restaurant, I didn't forget to order this classic Kimchi soup.  It is a complete flavour combinations in one bowl.  The sour salty taste that comes from kimchi, the star of this dish, is balanced with the sweetness from pork belly and is lifted up with the kick from gochujang or hot pepper paste.

With this pandemic is going on in outside world, it has changed my habit of eating out.  So I have to make my favourite food at home.  This soup is actually very easy and requires very short time in preparing and cooking.  Even beginner will have no problem making this dish.

Firstly, in a pot, cook your sliced pork belly with two cloves of garlic over medium high heat to give them a nice char color.  For the pork belly, I cut them a little bit thicker than normal slice because I like having to chew some chunck of meats.  Then add it in the kimchi and chilli paste and cook them until kimchi is slightly softened.  Kimchi and gochujang (hot pepper paste), these two ingredients are easily found in Asian groceries.  After that, pour water and juice of kimchi in.  Do not throw the kimchi juice away because this where all the flavour come from.  Reduce the heat to medium and bring them to boil.

Once it is boiled, you can season the soup.  I prefer to do it in this stage to avoid messing up the soft tofu and breaking those enoki mushrooms as well.  After I got the right flavour, I then topped with some soft tofu, enoki mushroom and scallions.  And lastly, I cracked one egg right in the middle and turned the heat off.  With this, the egg will come out nice and gooey.  Serve this dish with some steamed rice and it will become one of your top stew dishes.

Making this soup is very very simple yet taste absolutely unbelievable.  You always can use ordinary soup pot to make this soup as what I did.  So not to worry if you don't have that fancy black stew pot that the restaurant normally serves this kimchi soup with.

* For this recipe, I do not put the exact measurement for each ingredient because it was made with love and based on my mood too.
However, for this dish, I used half kilo of pork belly, one soup bowl of kimchi and two tablespoon-full of gochujang or hot pepper paste.  While the amount of soft tofu, enoki mushroom and seasoning is depending on your preference.

Gochujang / Hot pepper sauce


10 May 2020

Pork Belly with Marmalade Glazed

2020 is such a good numbered year, however reality appears opposite.  But do not lose our positive mind.  Hopefully this nigthmare will be over sooner than we can imagine.  I believe that we will get through this horrendous world problem together. 

Spending more time at home, makes me have more time digging into my old recipes that I had collected way long time ago.  Some of them I even haven't got chance in making them.  Like this menu today.  It is one of my fovorite protein, pork belly, glazed with marmalade and baked until tender to be enjoyed. 


First prepare your meat, remove the skin part and leave them for later.  Then mix all your glazing ingredients: orange marmalade, grated ginger, olive oil, vinegar, crushed garlic and seasonings.  Next heavily covered the pork chunk with glazing mixture.  And bake them in 180 degree pre-heated oven for one and half hour or until the meat tender thoroughly.  I like to smeared the left over glaze in the middle of cooking..

Once it done, it may look burn around the side but don't worry the meat itself tasted wonderful.  And you can go with some mashed potato or green salad on the side, I think even steamed rice if you prefer and it will go very well together.


You can serve them with some fresh greens or mashed potato.  I do both and they went amazingly together.


For the skin, such a waste to chuck it away.  Actually, I love eating pork crackling but I have never successfully attempted on my own.  This time I covered them with lemon juice and rubbed with salt all over the skin.  Then leave them to dry in the refrigerator for at least two hours before bake them in 220 degree oven.  No specific baking time here (because my one still not a triumph) but I have seen in the website that you just wait until it turns golden and all cracked.


Look at my crackling, half is perfectly crackled and another half is underdone.  Hmmmm... Still not entirely success.  I should leave them longer in the oven.  Better luck next time.

Recipe
Pork belly (skin removed)
1 kg
Orange marmalade
¼ cup
Red-wine vinegar
2 tbsp
Olive oil
2 tbsp
Grated ginger
2 tsp
Garlic, crushed
1 clove
Method
1. Preheat oven to 180⁰C. Line a baking tray with foil.
2. In a large jug, combine marmalade, vinegar, oil, ginger
    garlic. Add some seasoning.
3. Remove the skin part and cut the pork into three to four  big slices
4. Score the pork fat and place them on the prepared tray.
5. Pour marmalade mixture over and give gently massage.
5. Bake for one and half hours, or until pork cooked thoroughly.
6. Serve with mashed potato and greens
* For the skin, make it into crackling pork
   By rubbing pork skin with sea salt and leave it aside for
   minutes to dry out.  Bake it in a hot oven, 220⁰C,
   until the crackling is golden and crisp.
Serves: 4

17 April 2020

Super Easy Pork Burger

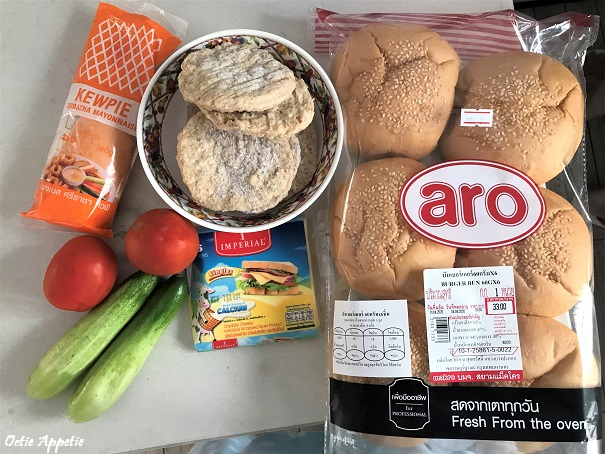
This is gonna be a very short post.  My lunch menu for today on the staying-home period.  Using my frozen pork patties and bun.  We need to keep ourself healthy, so I guess this burger got what it takes.  It has some carbs, protein, vitamins, calcium and most importantly deliciousness. 

I used this sriracha mayonnaise for the sauce.  It goes really well.  This sriracha mayo is absolutely my new favorite sauce compliment.  


Pan-toast the bread after spreading with some butter on it until golden brown.  Then arrange the fillings to your liking and squeeze in some of those heavenly sauce.  This menu is so simple yet irresistable.


Ingrediends
Ready frozen patties (prepare as instructed)
Burger buns (spread on some butter and pan-toasted)
Slices cheddar cheese
Greens: lettuce, cucumber and tomatoes
Sriracha mayonaisse
Sunny-side up egg *optional